Living in an urban environment often means sacrificing expansive green spaces. But the human desire to connect with nature isn’t easily extinguished. If you find yourself gazing at a small balcony, a cramped patio, or even just a sunny wall and dreaming of a lush garden, vertical gardening is your answer. It is the art and science of growing plants upwards rather than outwards, maximizing every square inch of available space.
As a seasoned gardener and content creator, I’ve transformed numerous tight spots into thriving green havens. Vertical gardening isn’t just about efficiency; it’s a creative way to add texture, color, and vitality to unexpected places. In this comprehensive, step-by-step guide, we will walk you through the entire process, from assessing your microclimate to selecting the perfect plants and maintaining your vertical oasis. This is your blueprint for creating a vibrant, living wall that will make you forget your limited footprint.
Step 1: Assess Your Space, Sunlight, and Constraints
Before you buy your first plant or planter, you must understand your environment. Not all vertical spaces are created equal. Spend a few days observing the potential spot. Does it receive full sun (at least 6 hours of direct light), partial shade, or is it mostly bright indirect light? This single factor will dictate your plant choices and the success of your garden.
Consider structural constraints. Will the garden be attached to a wall? If so, is the wall structurally sound and waterproofed? If you’re renting, you may need freestanding options. Also, think about accessibility to water. A vertical garden often dries out faster than a traditional one, so ease of watering is paramount. Understanding these logistics initially prevents costly mistakes and ensures long-term sustainability.
Step 2: Choose the Right Vertical System and Planters
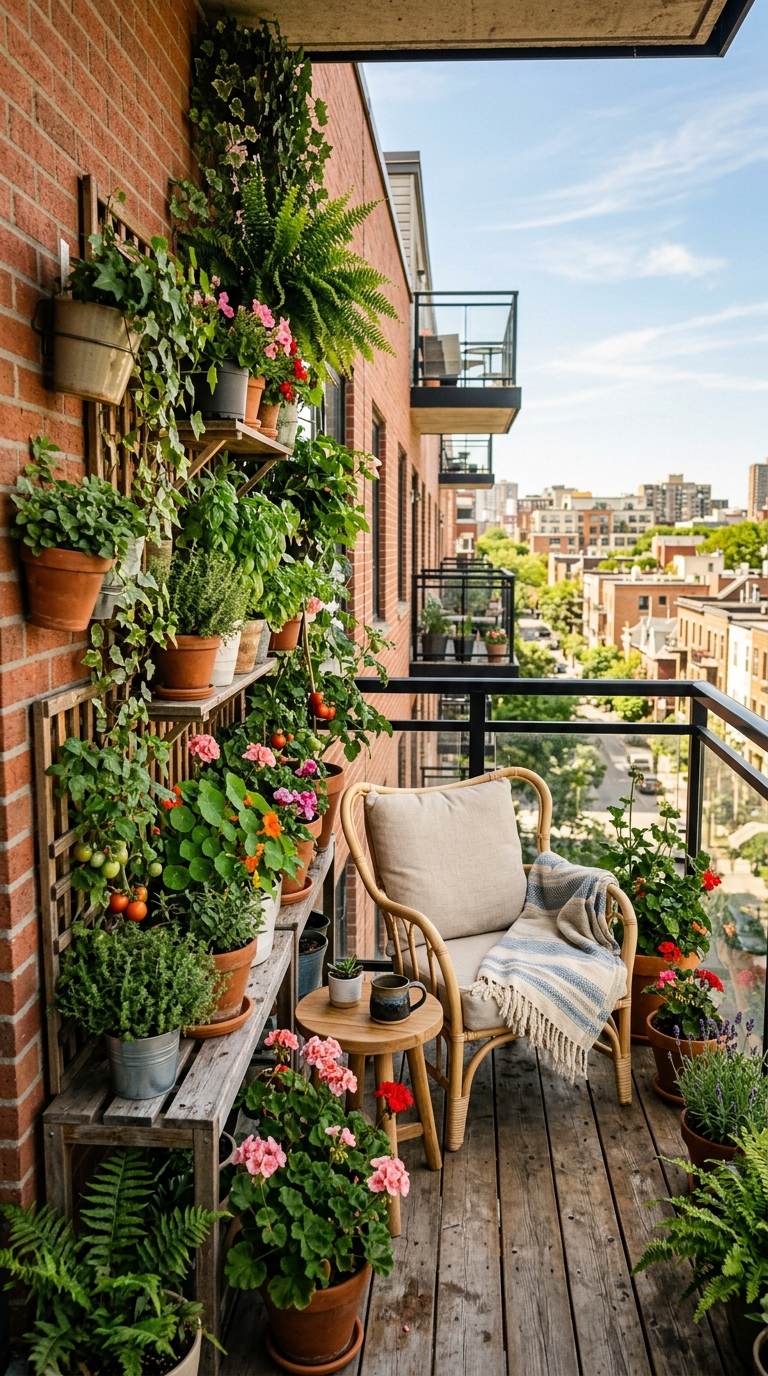
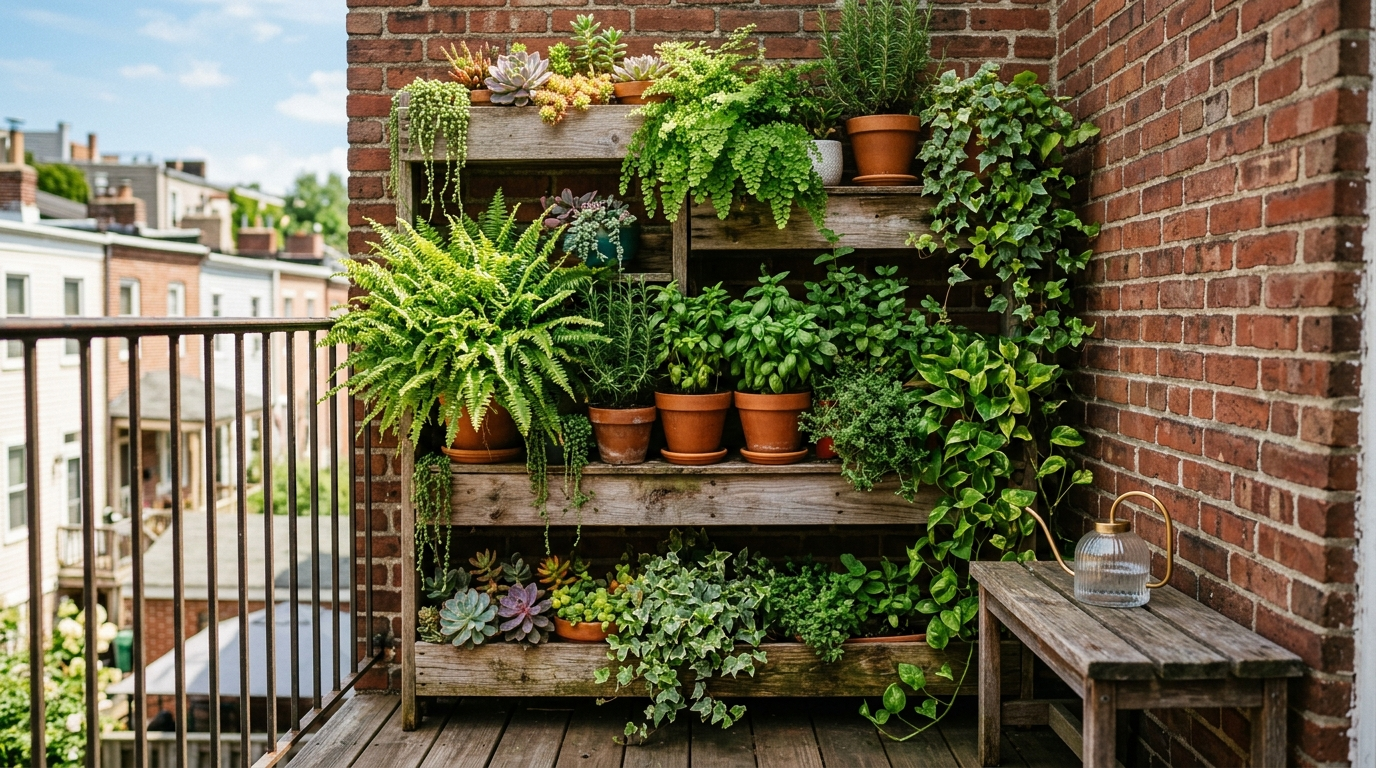
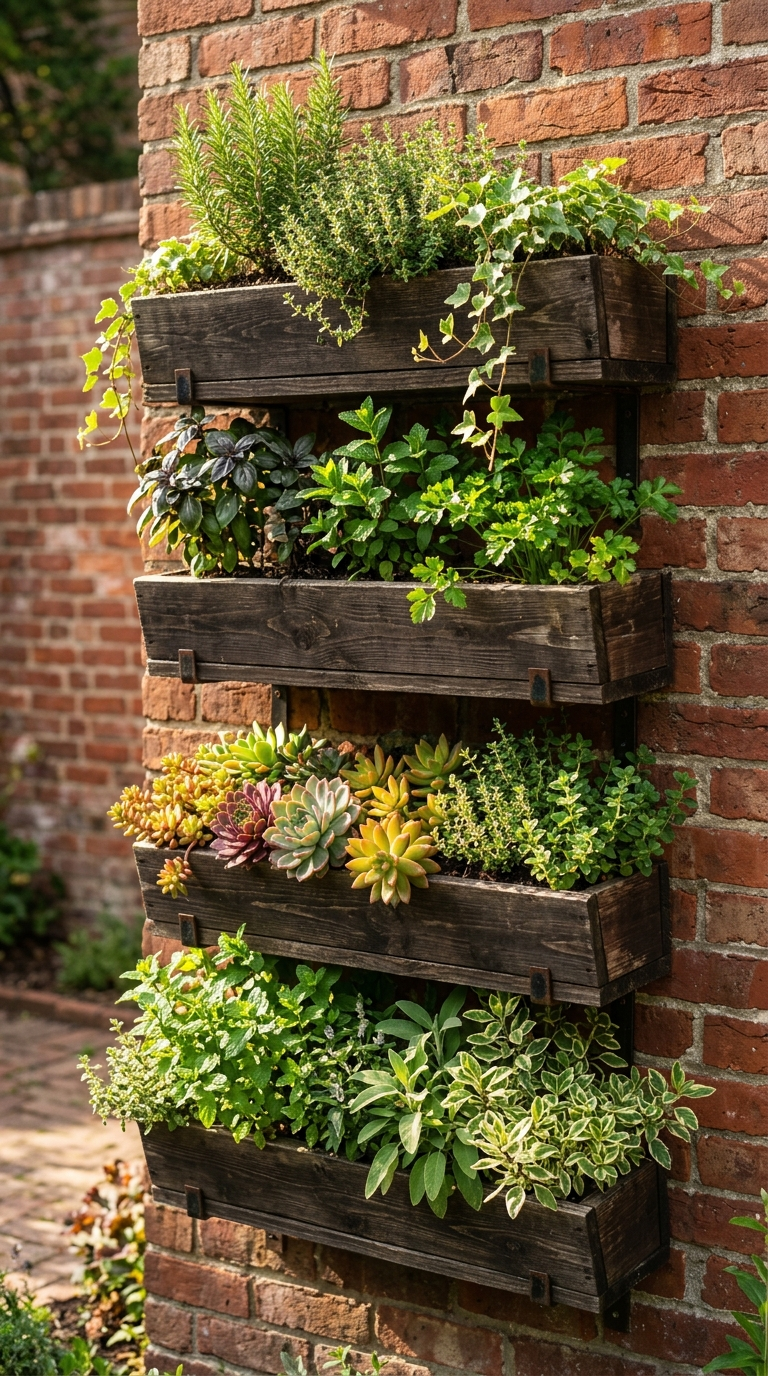
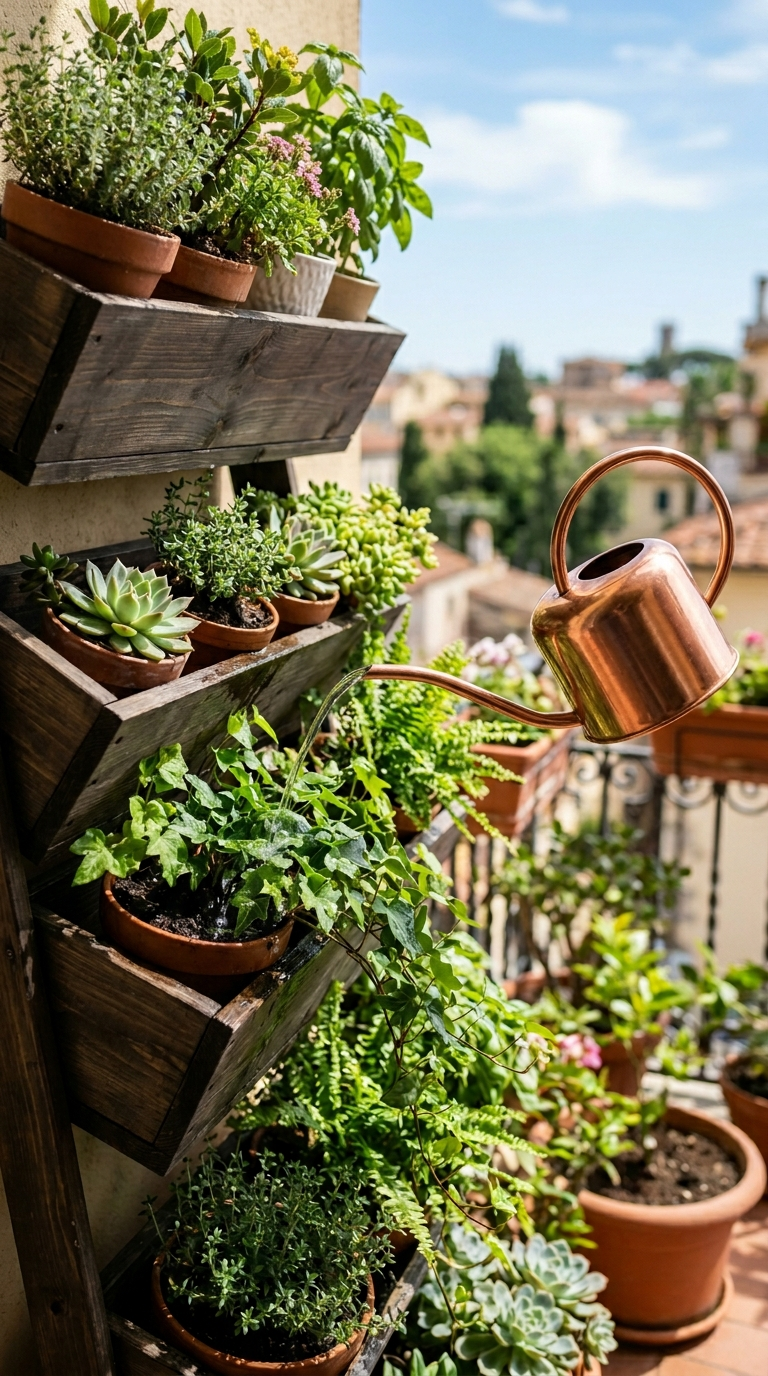
The market offers a dizzying array of vertical gardening systems, but you can also DIY many options. The right choice depends on your budget, aesthetic, and wall type. Popular options include felt pocket systems, stacked planters, trellises with attached pots, and modular plastic modules.
Felt pockets are lightweight and excellent for herbs and smaller ferns, but require robust waterproofing behind them. Stacked planters are easy to set up and self-supporting. Trellises are classic for climbing plants like ivy or jasmine. Modular systems offer scalability and integrated irrigation options. Choose a system that matches both your desired look and your technical comfort level. The key is appropriate drainage for every level of the garden.
Step 3: Selecting Your Vertical Plants: Match Plants to Structure
This is where the magic happens, but it must be grounded in realism. Based on your sunlight assessment (Step 1), choose plants that will thrive. For full sun, think herbs (thyme, oregano, rosemary), succulents, petunias, or even cherry tomatoes. For shade or partial shade, ferns, pothos, philodendrons, ivy, and peace lilies are excellent choices.
Crucially, select plants with similar water and light requirements for each ‘zone’ of your garden. Also, consider growth habits. Cascading plants (like string of pearls or ivy) are beautiful for softening edges, while upright plants (like bromeliads or small ornamental grasses) add structure. Ensure the plants’ root systems are appropriate for the depth of your chosen planters.
Step 4: Soil and Potting Mix for Vertical Success
Vertical gardens have unique soil requirements. The soil must be lightweight, retain moisture effectively, but also provide excellent drainage. Do not use garden soil, which is too heavy and compacts easily, stifling root growth and adding excessive weight to your structure.
Instead, use a high-quality, professional potting mix designed for containers, often containing peat moss, coco coir, vermiculite, or perlite. These ingredients ensure a lightweight medium that promotes healthy root development. Consider mixing in slow-release fertilizer granules to provide consistent nutrients over several months, as nutrients leach faster in vertical systems due to frequent watering.
Step 5: Master Watering and Irrigation in a Vertical Garden
Proper watering is the most common challenge in vertical gardening. These systems dry out rapidly due to small soil volumes and high exposure to air and sun. You must have a consistent watering plan. Hand-watering is possible for smaller gardens but requires dedication, as you need to ensure every level receives adequate moisture.
For larger or more complex systems, automated drip irrigation is highly recommended. These systems use thin tubing and emitters to deliver water directly to the roots of each plant on a timer. While requiring initial setup and investment, they save time, prevent over- or under-watering, and significantly increase the survival rate of your plants, making the garden much more sustainable.
Step 6: Assemble and Install Your Vertical Structure
It’s time to build. If you are attaching a system to a wall, ensure you use the correct anchors and screws for the wall material (brick, concrete, wood). If using felt pockets or wooden structures against a sensitive wall, install a waterproof barrier (like plastic sheeting) first to prevent moisture damage and mold.
For freestanding or stacked systems, make sure the base is level and stable. If installing a complex system with irrigation, run the tubing *before* adding plants and soil. Take your time during installation; a secure, level structure is vital for safety and the overall aesthetic. This structural integrity is the backbone of your living artwork.
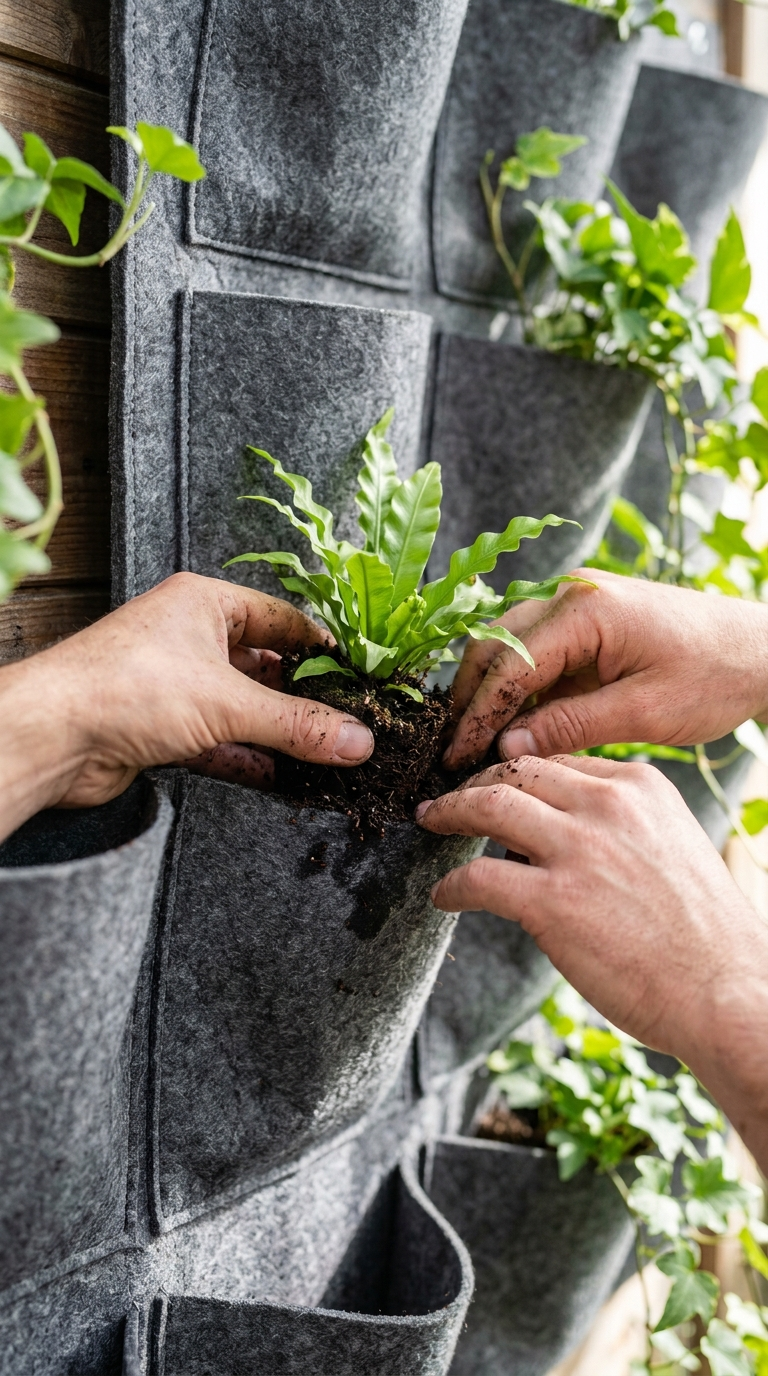
Step 7: Planting for Density and Success
When you are ready to plant, gently remove each plant from its nursery pot and loosen the root ball. Place them into your chosen pockets or modules. For a living wall effect, plant relatively densely, but still allow some room for growth. Mix different textures and colors deliberately to create visual interest.
After planting, fill any gaps with potting mix and firm the soil gently around the roots. Immediately water the entire garden thoroughly to settle the soil and reduce transplant shock. This initial saturation ensures good contact between the roots and the new soil medium, setting the stage for healthy growth.
Step 8: Ongoing Maintenance: Pruning, Fertilizing, and Monitoring
A vertical garden is a living thing, not static decor. Regular maintenance is required. Monitor soil moisture daily (or set your timer correctly). Prune dead or yellowing leaves to encourage new growth and maintain the shape. Be proactive with pest control; inspect the underside of leaves regularly.
Since nutrients leach quickly, feed your plants regularly with a balanced liquid fertilizer (diluted as directed) throughout the growing season. This ongoing attention ensures your vertical oasis remains vibrant and lush, transforming your small space into a thriving, dynamic botanical display.
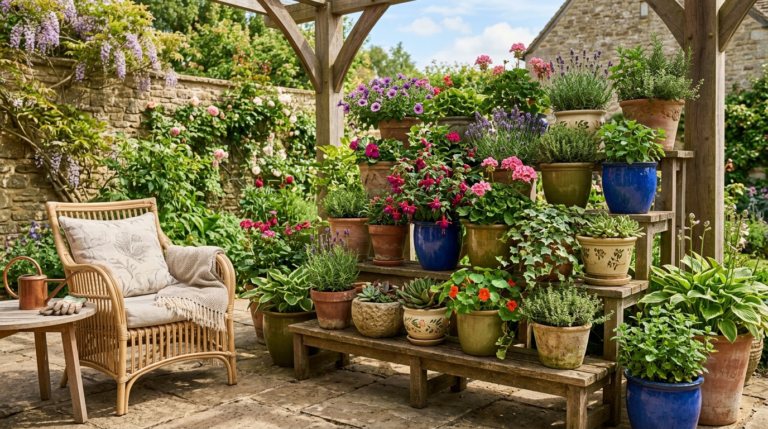
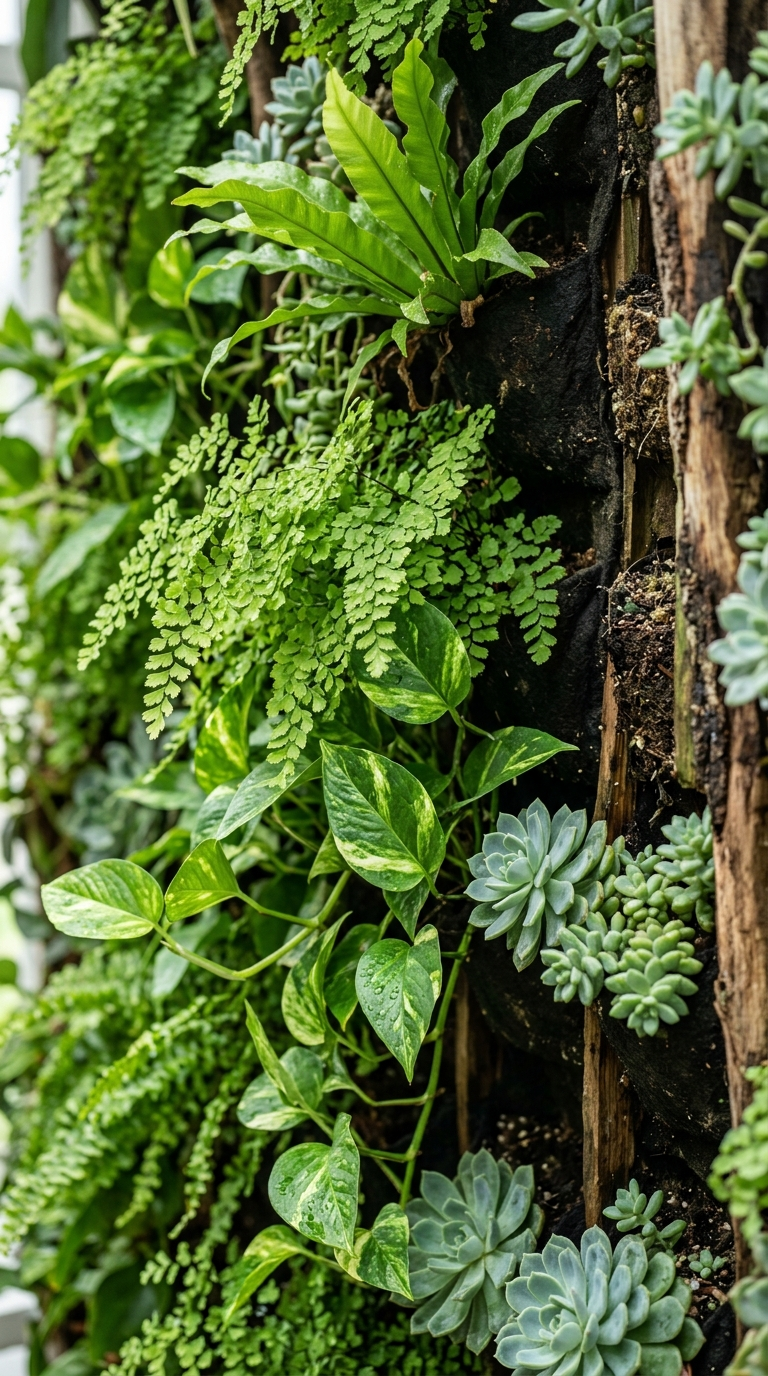
Designing for Aesthetics: Texture and Color Play
While function is key, beauty is the goal. Use plants to ‘paint’ your wall. For a calming effect, use different shades of green with varied textures—the delicate fronds of a Maidenhair Fern against the smooth, broad leaves of a Pothos. For energy, introduce colorful foliage like Heuchera (coral bells) or Coleus, or flowering plants like Portulaca or Petunias for seasonal bursts.
Consider the ‘thriller, filler, spiller’ concept vertically. Top rows can feature dramatic, upright ‘thrillers.’ Middle rows are ‘fillers’ that create density. Bottom rows are for ‘spillers’ like ivy or sweet potato vine that cascade gracefully, softening the hard lines of the structure and connecting the garden to the space below.
Best Vertical Plants for Shady Small Spaces
Many urban balconies and patios are plagued by shade. Don’t despair; this is the perfect environment for a dramatic, low-light jungle. Pothos (Epipremnum aureum) is almost indestructible and cascades beautifully. Heartleaf Philodendron (Philodendron hederaceum) is similar and elegant. Ferns, including Boston Ferns (Nephrolepis exaltata) and Bird’s Nest Ferns (Asplenium nidus), add incredible texture and softness.
For upright structure, use Peace Lilies (Spathiphyllum spp.) or Cast Iron Plants (Aspidistra elatior). English Ivy (Hedera helix) provides classic cascading greenery. A shaded vertical garden using these plants feels cooler, calmer, and incredibly lush, transforming a gloomy corner into a peaceful retreat.

Common Vertical Gardening Mistakes to Avoid
Learn from those who came before you. The most frequent error is improper watering—either drowning the bottom rows while the top is parched, or neglecting the higher frequency required. Another mistake is ignoring weight; ensure your wall and structure can handle the weight of wet soil and mature plants.
Don’t select plants with conflicting needs for the same system. Avoid overcrowding; plants need air circulation to prevent fungal disease. Lastly, don’t neglect structural maintenance; check connections and waterproofing regularly. By anticipating these challenges, you ensure your vertical garden remains a joy rather than a chore.
Conclusion
Creating a lush, small space vertical garden is a tangible way to reclaim your connection to nature, regardless of your property size. By following this step-by-step guide—from careful assessment to ongoing maintenance—you can successfully build a living wall that adds vitality, color, and joy to your urban environment. Let your imagination soar upwards and transform that forgotten wall into a thriving botanical masterpiece.